In this article I want to give a quick overview about the integration of Visual Studio Code and Git with Azure DevOps on my Windows 10 machine.
Azure DevOps – formerly VSTS – is the version of Team Foundation Server hosted on Microsoft Azure. Azure DevOps includes Azure Pipelines, Azure Boards, Azure Artifacts, Azure Repos and Azure Test Plans.
To gain first experiences with Azure RM Scripting, automated deployment and code repositories I looked at Visual Studio Code (VSCode). This is a free source code editor from Microsoft. With Azure Repos you get free private Git repositories and will be able to do code collaboration in the cloud.
Setup Visual Studio Code & Git
First download the latest version of Visual Studio Code from https://code.visualstudio.com/ and install it. Start the application and install the extension: Azure Repos
The next step is to download the latest version of Git from https://git-scm.com/download . Choose all the defaults except change VS Code to the default editor. That’s optional but I did it.
If you haven’t created an Azure DevOps project yet, you should do so now. You have as well a new created repository. Navigate in your browser to Azure Repos.
I have created a folder to synchronize the repository to the local harddisk.
C:\_repos_>In the File-Explorer there is now the option “Git Bash Here” with right click available. The following window appears in which you initialize Git with the command “git init”.
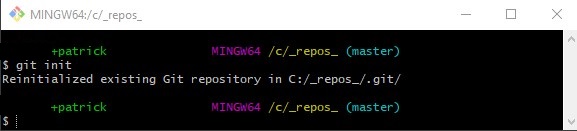
This command creates a subdirectory .git, which contains all relevant Git Repository data, i.e. a Git Repository framework.
Clone Git Repository from Azure DevOps
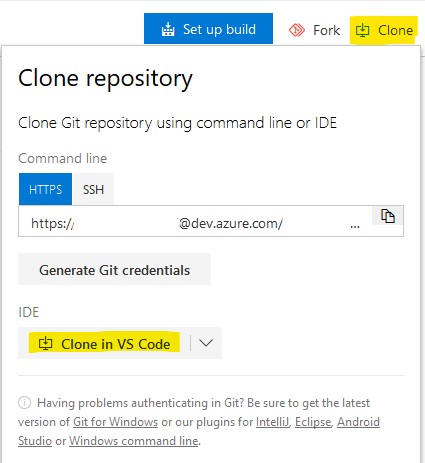
The next step is to clone the git repository from Azure DevOps to the local disk.
git clone "https://[email protected]/ORGNAME/DevOpsProjectName/_git/This%20is%20my%20REPO" "c:\_repos_\ThisIsMyRepo"Update: this Bug has been resolved!
Note: In Azure DevOps there is a button that you can press to synchronize. It doesn’t work if the URL contains spaces because of a bug. For this reason, I executed the clone command via the Git Bash. Therefore, replace the “blanks” with %20 and it will work.
The next command is only needed if the repository is completely empty. It will create a completely new history of the project. If you do not execute this command, Git will not work in VSCode.
git pull --allow-unrelated-histories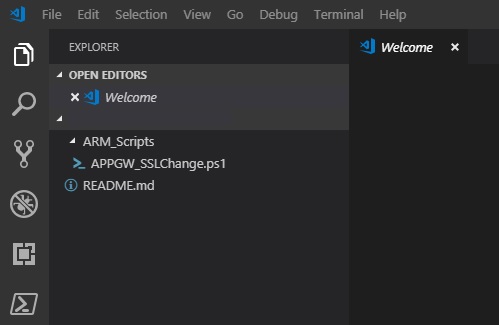
If you are now starting Visual Studio Code you need to click “Add Workspace folder…” on the welcome screen and choose the Git Folder on your harddrive. This will look like this. As you can see, I have already created a folder and a new PowerShell file.
Signin to Azure DevOps-Team
To collaborate with your team in Azure DevOps you need to sign-in first. For doing this click on “View” in the navigation pane and choose “Command Palette” or press “CTRL+SHIFT+P”. In the command window enter “Team: Signin” and choose your authentication method. I prefer the “new experience”.


I already described this new authentication method in the post about the PowerShell Az module.
Now you are ready to start your code-collaboration with Visual Studio Code, Azure DevOps and Git repos. Feel free to give feedback on this post and add comments.

Thanks you for the article! But some things are still not clear to me.
1 – my co-worker did all this in VS Code without installing Azure Repos.
Is that expected?
2 – How can I see a visual representation of my local and remote repositories?
Is there something like TFS Source Control Explorer?
3 – Is the command line necessary even with Azure Repos?
Thanks!
Hi
yes, you have to manually sync the GIT repository like described in “Clone Git Repository from Azure DevOps”
to your questions:
1- you need to create an Azure DevOps Account (dev.azure.com) and there create a repository, which can be synced then, Azure Repos has to be installed in VS Code as described in the article. (Start the application and install the extension: Azure Repos)
2- this can be seen in Azure DevOps portal
3-please follow the steps “Clone Git Repository from Azure DevOps” it should work as described here.
thanks
Hi,
I have couples of questions:
1. What if I already have a folder consisting my does in VsCode so I would like to import the codes to respective Projects in Azure DevOps, then to respective Repos.
2. My code is pointing to the wrong Projects, how can I change this through VsCode?